Installation
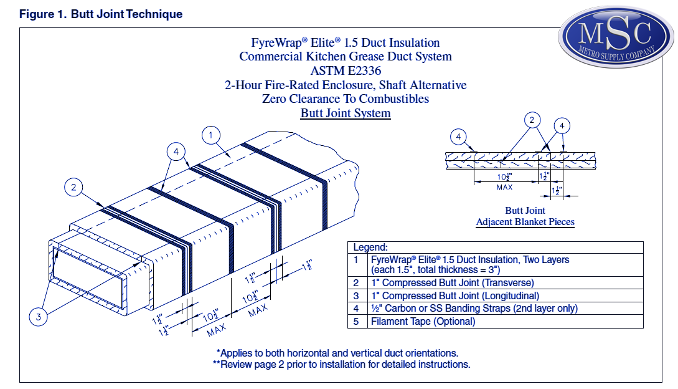
The FyreWrap Elite 1.5 Duct Insulation ASTM E-2336 System consists of a two-layer system applied directly to the duct surface. The FyreWrap Elite 1.5 insulation system may be installed at zero clearance to combustibles at any point. Install both layers of wrap with transverse (perimeter) and longitudinal butted joints. Between the first and second layers of wrap stagger transverse joints and offset longitudinal joints to different corners. All visually exposed blanket edges are to be sealed with minimum 3" wide aluminum foil tape and the use of filament tape is not required but is permitted to ease installation. See figure 1:
|

|
Attachment Options
Three attachment options are available for installers. Choices are limited by the duct width dimension. Details on each option are provided below.
Banding Only: For Duct Widths 24" or Less|
Place bands at 1½" on both sides of all second layer transverse butt joints and add additional bands as needed to ensure spacing is max. 10½" on center. Tighten banding to firmly hold the wrap system in place but not so tight as to cut or damage the blanket. Secure bands with crimp clips.
Note: No bands are required on the first layer.
Banding and Pins: For Duct Widths Up To 48"
For ducts greater than 24", in addition to installing bands as described in the Banding Option, weld steel insulation pins in rows to the underside of horizontal runs*. Locate pins on both sides of all second layer transverse butt joints 3" apart. Add additional rows as needed to ensure longitudinal spacing is max. 10". Pins in each row are to be max. 6" from each duct edge and max. 12" on center. Impale FyreWrap Elite 1.5 Duct Insulation over the pins and secure with washers (cup head pins also permitted).
*Pins are not required on vertical duct sections when using this option.
Pins Only: For Any Duct Width
In lieu of banding, pins installed on all sides of the duct is permitted. See Pin placement above.